
How to convert mixed-text data to a numerical range
With the exponential expansion of MarTech and SaaS apps in general, there are now more than a hundred thousand SaaS apps on the market and hundreds of thousands more to come. Today, the average business uses 130 apps, up 18% from the previous year. The purpose of all these technologies spans the range of human possibilities, but they are all united by their ability to produce one thing: data, lots and lots of data. While this avalanche of data is great news for B2B marketers and sales teams that can make sense of it, for the majority that struggle with the mind-numbing variety of formats and standards, the news couldn’t be more stomach-churning.
If you’ve ever tried to wrangle your international or mixed-field data from its source into Marketo or Salesforce, or exceeded your API limits due to a field mismatch, take heart, because we have an automated solution that simplifies the whole process. In the following paragraphs, we’ll take you through the solution for converting mixed-text data to a numerical range available to Openprise RevOps Data Automation (RDA) Cloud users. While the process is specific to the mixed-field problem, the approach is universal to the RDA Cloud, and all in a day’s work for the Data Essentials solution used to clean and standardize our customers’ data.
How Openprise RDA Cloud converts mixed-text fields
In this example, we’ll start with a field with values that should contain numbers but has a mix of text and numbers instead, which is very common with fields that deal with revenue or the number of employees. The goal is to provide a numerical range, so the data must be cleansed and standardized, converted to numbers, and then placed in the ranges.
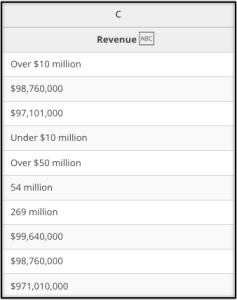
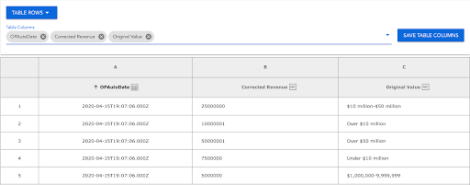
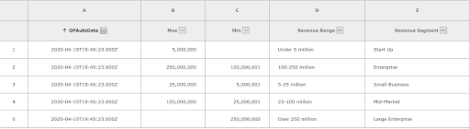
Let’s start with a Revenue field that has a text format. Data could appear in multiple formats as in the screenshot below, such as with or without `$,` with or without `,` and with words such as `under,` `over,` or `million.` There might also be values like `$10,000,000-50,000,000.`
Step one
Because the numbers we want to look at have characters such as `$` and `,` the first step is to remove these characters.
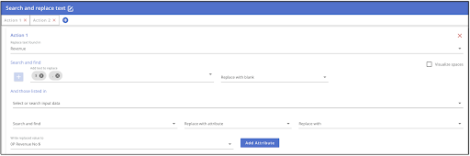
- Using the Search and replace text task template, we replace the `$` and `,` with a blank and replace the word `million` with six zeroes to make it look like a number. This can be done in two actions in the same task.
- Action 1 removes the `$` and the `,`.
-
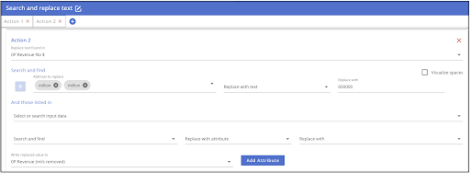
- Action 2 replaces `million` with `000000`. One of these has a space before it, so we can replace the space as well as the word.
- Now we can compare the data we started with to the data from our outputs:
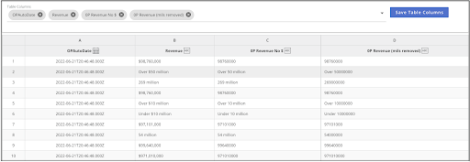
Most of the data now looks like a whole number, without any symbols, but there are still some values that aren’t numbers:


Step two
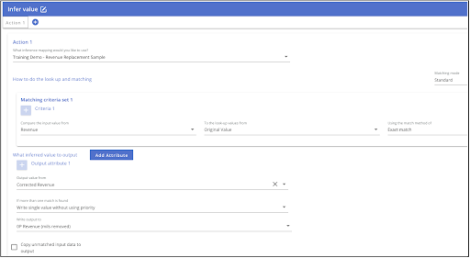
To assign these, we can create a data source to use with an Infer value task template:
For values like “$10 million-$50 million,” we chose in this example to take a value in the middle, 25000000, but selecting the value you want to use would be at your discretion. You could also choose something like 50000000 if you wanted the highest possible value, or 10000000 if you wanted the lowest. Similarly, for “Over $10 million” we chose to use just one dollar over that, but the user could select the value that they felt most accurately represented what they know from this field.
- We can then use a filter to include only records that contain `over,` `,`, `under,` or `-` for this task and then infer the value we want from this data source:
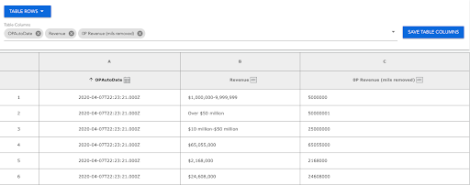
- Now all the records are in the same text format that contains only numerals in the OP Revenue (mils removed) field:
Step three
From here, we can use the Change attribute type task template to convert the text numerals to a number.
Remember to use `whole number` as the attribute type when creating the new attribute, because only numbers can be put in numerical ranges; real numbers are unnecessary, because you don’t need to worry about cents here.

Step four
Now that we have numbers, we can assign them to ranges.
- First, we’ll need a data source that assigns ranges
- As with the previous step, when setting up the data source, we’ll need to make sure our “Min” and “Max” columns are imported as whole numbers.
- Now we can assign the ranges using the Assign value to range task template. In the above example, we have both Revenue Range and Revenue Segment in two actions. As you can see by the `123` in the field descriptions, the formats for the “Max” and “Min” values are now numerical. The system gives us the flexibility to create one or both to accommodate any business requirement.
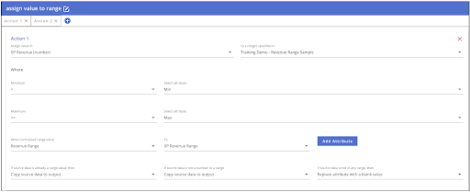

- Here, we’ll need to make sure to check the output to confirm we’re getting the results we expected.
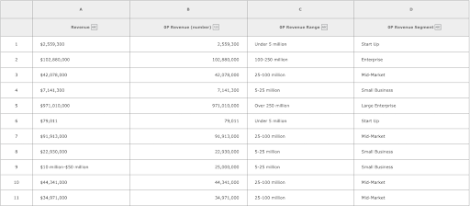
Note that you could have a field like 0P Revenue Range to show a number, or like 0P Revenue Segment to show what kind of business that number indicates for your company. If these names or ranges changed in the future, you’d just need to update this table in the data source to update to the new ranges or values.
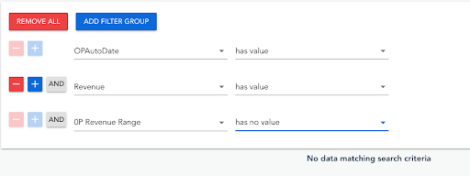
- We’ll also need to check and validate to make sure none of the original revenue values are missing a Revenue Range or Revenue Segment.
- If there is an unmatched value at this point, we’ll need to either adjust the tasks or create a new task to manage any data not already mapping. Here’s what the final process looks like when we’re finished.

Those are the four steps to convert a mixed field to a numerical format. As you saw, the no-code solution is simple enough for any non-technical user to follow and complete. The automation of data quality jobs like this is just one capability provided by the RDA Cloud. To learn more about the cloud and how it can help you better orchestrate and operationalize your data across all your funnels, schedule a demo with one of our data consultants today.